Hello there,
Thank you for stopping by today at On the Cutting Floor. This is the Tutorial: Ruffler Presser Foot Explained
If this is your first time in our blog, remember to check our FREE SEWING PATTERNS page.
On that page you will find our collection of free sewing patterns for women, kids and men.
You can also visit our SEWING TUTORIALS and our SEWING REVIEWS.
We also have an ETSY STORE, where you will find unique and modern sewing pattern for women.
Fancy little piece, eh? That’s what I thought when I saw this one online. At the time, I was on my first attempt to make a home business by selling clothing online on Etsy.
I knew that I did not have enough money for a fancy new sewing machine, but I needed to work faster with more professional results.
That is why I started looking at alternatives for it, the presser feet were my answer.
This was the fanciest one LOL
I knew that I did not have enough money for a fancy new sewing machine, but I needed to work faster with more professional results.
That is why I started looking at alternatives for it, the presser feet were my answer.
This was the fanciest one LOL
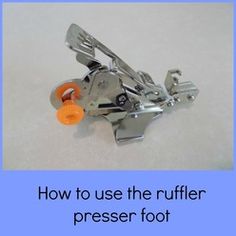
PARTS:
The ruffler has basically two main parts that will determine the width of the ruffle and the spaces in between. That means that you will be able to make as many combinations as you like!Looking at the picture below, the orange wheel will determine the width of the ruffles.
The plaque at the top will give three options:1 ruffle per each stitch
1 ruffle per 6 stitches
1 ruffle per 12 stitches.
The plaque at the top will give three options:1 ruffle per each stitch
1 ruffle per 6 stitches
1 ruffle per 12 stitches.
SETTINGS
Take your regular presser foot off and attach the ruffler by engaging it with the screw.
The fabric should go in between two little black plaques at the bottom.
Put the setting on your machine for the needle in the middle, straight stitch.
The fabric should go in between two little black plaques at the bottom.
Put the setting on your machine for the needle in the middle, straight stitch.
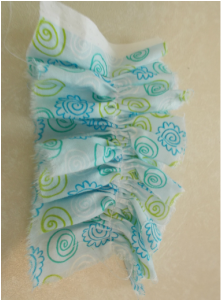
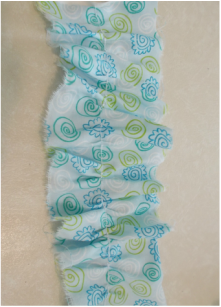
I have tried two settings, the shortest stitch with 1 ruffle per stitch (left side) and the middle width stitch with 1 ruffle per 6 stitches. Those were the results in no time!
|
|
|
Leave a Reply